| Email John |
| Last update 12/09/2010 |
Throwaway Propane Tank Refiller

Be sure to REFRESH each page on this site as I'm adding content on a daily basis.
Yeah, yeah, I know that the government warning says that it's illegal to refill. As with a lot of things governmental, that's not quite the truth. The actual law makes it illegal to sell refilled cylinders in interstate commerce. This is one of those profit protection laws that congress is fond of passing.
Anyway, the actual refilling is easy. All we need is a connection between the cylinders and a small differential pressure to drive the liquid propane. Gravity is a good source of pressure as is temperature.
The goal is to refill the cylinder without overfilling which can cause the excess pressure valve to weep propane. The correct way to do this is by weight. I normally overfill just a little and then bleed out propane until the cylinder weight is correct. There are other method that I'll describe below.
Before we begin, let's look at the anatomy of a throwaway tank.
tanks filled since 05/22/2007

The plastic seal ring is most important. This is the primary pressure seal. It seals to the mating stem. If this ring is missing or damaged, the connection WILL leak. There is a secondary gasket on the coupling that mates to the top of the cylinder fitting but it will NOT stop a leak caused by a defective seal ring.
The safety valve is a reverse shraeder valve. It lifts to relieve excess pressure in the cylinder. It can also be lifted with a pair of needle nose pliers to manually relieve pressure, such as when filling. If this valve is opened, either by overpressure or manually, it will frequently leak and will need to be lifted and allowed to snap shut to stop the leak.
The safety valve can be removed with an ordinary tire valve stem remover tool. If the valve leaks, sometimes removing and reinstalling it will stop the leak.
This adapter is OK for occasional use but it is clumsy to have to reach under the source tank to turn the valve on and off for each tank. I address that problem with a slightly more complex adapter.

This adapter adds several inches of pipe and a ball valve.
Even purchased from a high priced place like Ace Hardware, the total cost of parts is under $15. Here is a list of parts:
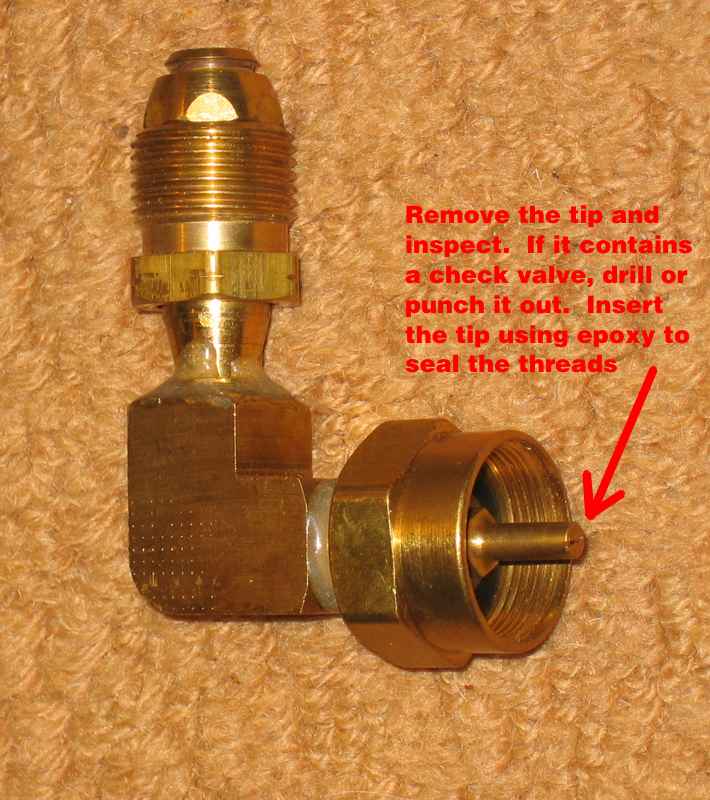
- Mr Heater #F276139 Soft Nose POL to 1/4"NPT adapter.
- Mr Heater #F273754 disposable cylinder to 1/4"NPT adapter.
- female 1/4"NPT elbow
- 1/4" WOG (water oil gas) ball valve
- 1/4NPT X 6" brass pipe nipple.
- Epoxy.
You may substitute the Mr Heater ACME to 1/4NPT adapter that fits the OPD valve if you like. I'd rather have an all-metal assembly since the POL fits the OPD valve too.

Assembly is pretty obvious. Apply the epoxy to the male thread and screw the joints together. Pay attention to the direction of the ball valve. If you point the handle the wrong way it will interfere with the disposable cylinder adapter. Point the handle up.
Use
I normally use a 20 lb grill tank as my source tank. It's light enough to handle fairly easily.
If you're going to fill by weight, weigh each disposable tank and write down the weight. This is the tare weight. I usually write the tare weight on the side of the cylinder with a permanent marker.
Attach the adapter to the tank and then flip it over and set it on the edge of a support so that the disposable cylinder hangs below the support.
Make sure the ball valve is closed. Turn on the tank valve and crack the ball valve until liquid propane emits from the nozzle.
Attach the disposable tank. It helps greatly to stick the disposable tank in the freezer for a bit. This lowers the vapor pressure in the small tank and makes the propane flow faster. It also helps to warm the source tank a bit. Running hot water over the tank for a few minutes will do the job, as will wrapping it with heat tape.
You will hear propane running into the small cylinder. If the small cylinder has been frozen and/or the large tank heated, you will be able to feel the temperature difference as the liquid level rises.
Stop filling when the liquid level is about an inch below the top of the straight walls of the small tank.
If you're filling by weight, close the ball valve and remove the small tank. Weight it again. Record this as the gross weight. Subtract the tare weight from the gross to obtain the net product weight of the propane in the cylinder.
Allow no more propane than the tank label calls for. Bleed some out if the tank is too full. This is most easily and rapidly done with another #F273754 adapter. The safety valve can also be lifted with needle nose pliers to vent. This is messy and you'll almost always end up smelling like the odorant so the adapter is recommended.
With experience you'll learn how much propane to put in the cylinder so bleeding will rarely be necessary. Since you can fill cylinders at will and therefore don't need to cram in the last ounce, it's probably best to underfill the thing a bit.
Alternative gauging method
There is an alternative method of gauging the proper fill if you don't mind smelling like propane at the end. This method involves tipping the cylinder and lifting the safety until no more liquid propane emits.
The procedure is simple. Simply tilt the cylinder about 45 degrees to the side with the safety at the lowest part. Lift the safety with needle nose pliers until on gas escapes. This results in pretty much the perfect quantity at about 70 deg F. If it is significantly colder (the propane is denser) then tip the cylinder a bit more than 45 deg.
Anytime you lift a safety, drip some soapy water in the hole to make sure there isn't any leakage. If there are bubbles, lift the valve stem and let it snap out of the pliers' jaws. In about 999 times out of a thousand this will seat the valve and make the leak go away. If it doesn't, try again. If it still leaks then either throw the cylinder away or remove the valve with a tire valve core tool and re-seat it. If that doesn't work then throw the cylinder away.
After filling several hundred cylinders using the above method, a new idea dawned. Once the pressures are equalized in the cylinders (quickly), the only thing driving the propane from the large tank to the small one is gravity. That is, the head pressure developed by the approx foot of vertical pipe plus the liquid level in the big tank. Things can be sped up by chilling the small cylinder, lifting the safety to bleed off vapor or heating the large cylinder but in general, the process is slow.
I was warming my feet with
my Coleman BlackCat catalytic heater hooked up to a 20 lb tank by a Coleman
POL to disposable 6ft long adapter hose when an idea struck.
Here is the result:
You'll notice that the new assembly consists of a 30 pound propane tank
operated upside-down, a standard Coleman 6 ft long POL to disposible tank adapter
hose and a new assembly that serves dual purposes.
 I call this assembly the "Tank Drainer".
This device serves two purposes. One is to drain a partially empty
tank into another. Let's say you have an appliance that you know uses
almost but not quite all of a tank during normal use. Unless you
want to change tanks in mid-use, you start with a new one. This
leaves one almost empty but still containing useful contents. The
solution is the Tank Drainer. This is exactly analogous to the
ketchup bottle drainers you see waitresses using in restaurants.
Gravity will do the job or the top tank can be heated a little.
I call this assembly the "Tank Drainer".
This device serves two purposes. One is to drain a partially empty
tank into another. Let's say you have an appliance that you know uses
almost but not quite all of a tank during normal use. Unless you
want to change tanks in mid-use, you start with a new one. This
leaves one almost empty but still containing useful contents. The
solution is the Tank Drainer. This is exactly analogous to the
ketchup bottle drainers you see waitresses using in restaurants.
Gravity will do the job or the top tank can be heated a little.

Here it is attached to the end of the hose. Simple, huh?
 Here
it is attached to a cylinder and filling is in progress. Now we have
over 8 feet of head pressure, counting the liquid level in the source
tank, driving the liquid propane. No bleeding or chilling is
necessary, though chilling this tank will make it fill faster.
Here
it is attached to a cylinder and filling is in progress. Now we have
over 8 feet of head pressure, counting the liquid level in the source
tank, driving the liquid propane. No bleeding or chilling is
necessary, though chilling this tank will make it fill faster.
An additional benefit is that the cylinder can be weighed while being filled. Simply sit the connected cylinder on the scale and tare out the weight. Then fill until 1 lb is indicated. This takes from 5 to 10 minutes, depending on the temperature.
If the cylinder is overfilled, the Tank Drainer can be used for another purpose - removing the overfill. Remove the TD from the hose. Crack the ball valve and tilt the tank sideways at perhaps a 45 degree angle. Direct the liquid discharge spray away from your body. Let it bleed until only gas emits.
Try to visualize the liquid level in the tank. We want the liquid down to about the bottom of the relief valve which is also about the top of the label in the picture above. This is about the 90% fill level and leaves room for expansion when the propane warms up.
Note - Just on general principle, I store my tanks outside. I have a locking storage cabinet on the front porch (hey, this is the country!) where I keep them. Two reasons. One is the obvious safey benefit of not having many pounds of propane in the house. The second is that these cylinders tend to stink for awhile after filling, especially if bleeding has to be done. I don't like the stink so I keep 'em outside.
CAUTION:
Do I really need to tell anyone that propane is flammable? That this refilling should be done outside and out in the open where heavier-than-air propane gas can't collect? Not to smoke or have anything hot or burning in the area?
I thought not.